Installation Tips
Getting Started with the Minuteman Driver
Before Starting the Engine
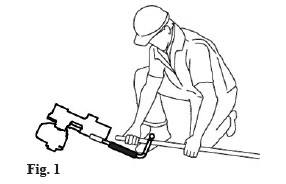
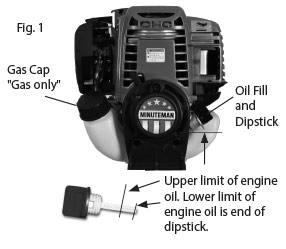
This engine is shipped without gasoline or oil. The first time you fill the oil use ONLY the supplied 2.7 oz of 10W30 SAE motor oil. The maximum fill level should not exceed 3.2 oz when refilling the oil. For a proper reading, do not screw the oil filler cap on completely and the post driver should be vertical when filling the oil. (Fig. 1)
This engine does not require any mixing of oil and gas. DO NOT MIX OIL AND GAS. Follow the engine manual filling instructions and use only clean, Unleaded Gas, US 86 Octane (>Euro 91). Make sure both the gas and oil cap are fully threaded closed before running the tool.
Installing an Adapter
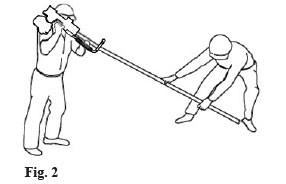
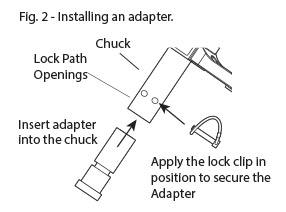
The Minuteman Patented Adapter System is comprised of the chuck, the locking pin and adapters. (Fig. 2) For driving t-post, chain link fence posts (1-3/8″, 1-5/8″, 1-7/8″, 2-3/8″ and 2-7/8″), 1″ ground rods, or form pins, ground anchors, round wood posts up to 3″ and tree stakes. The Minuteman is designed with a Quick Lock Adapter System. Using the correct Adapter will align the rod or post to the optimum striking position. This prevents damage to the driver. Simply insert the adapter inside the chuck tube and push the lock clip through the lock path openings on the chuck. Then stretch the clip latch over the end of the pin to secure the Adapter into place. See Chart 1 for post sizes and required Adapters. Remove the pin if you do not have an adapter inserted.
ALWAYS HAVE THE ADAPTER LOCKING PIN IN PLACE WHEN USING ADAPTERS
Rotating Handle Operation
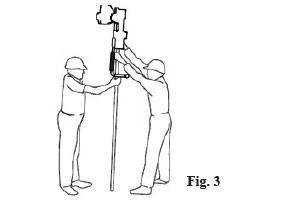
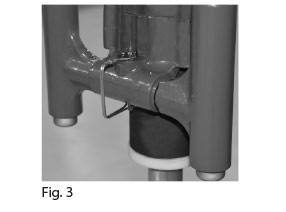
To rotate the handles to the extended position, on the Minuteman XL8, make sure the post driver is either on the ground or on a stable, driven post. Both of the operatorís hands must be free to open and release the handle locking pin at the back of the post driver body (Fig. 3) to be able to turn the handles down. While the weight of the driver is supported independently from the operator, unhook the clip latch from the end of the pin. Slide out the locking pin and rotate the handles down until they are aligned underneath the driver. Next slide the pin back into place, and stretch the clip latch over the end of the pin, until closed, to lock the handles in the down position.
ALWAYS HAVE THE ROTATING HANDLE LOCKING PIN IN PLACE BEFORE DRIVING POSTS
Adapter Use
An Adapter that is too large for the post being driven may damage the driver and may damage the end of the post. Using the appropriate Adapter will align the post to optimum striking position and prevent damage to the driver. See driveable post types chart to specify the appropriate Adapter for your application.
Starting the Engine
Move the Choke lever to the closed position. Press the primer repeatedly until fuel can be seen in the clear return line. Switch the throttle switch to the ON position. Holding the driver upright slowly pull the starter grip until you fill a resistance, then with a swift motion pull the starter grip to start the unit. Gradually move the choke lever to the open position as the engine warms up. Do not throttle the driver when not seated on a post as it will damage the unit.
Driving a Post
1.) Start with the unit on the ground running and with the opposite end of the post lined up with where it will be driven into the ground. (Fig.1)
2.) Insert the post fully into the chuck. Raise the driver and post together. When driving tall post, follow safe working practices by having a second person as a helper if needed. Do not attempt to drive a tall post if the operator is not in the proper position to operate the post driver safely.
(Fig. 2 & 3)
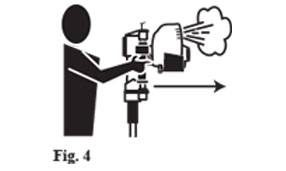
3.) Holding the post driver with your left hand on the foam grip and your right hand on the throttle will position the driver to direct the engine exhaust away from the operator. (Fig. 4)
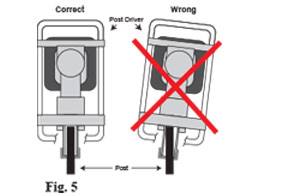
4.) Center the driver on the post. Do not allow the driver to tilt forward, back or to the side. If not aligned properly, damage could be caused to the driver or the post. (Fig. 5)
5.) Apply steady downward pressure to the handles and apply enough throttle to engage the clutch and hammer. Drive the post in approximately 6″ – stop. Use a level to ensure the post is plumb.
6.) Once you are confident that the post is driving straight, apply full throttle to the driver until the post is driven to the desired depth.
7.) Release the trigger dropping the engine RPM back to idle before removing from the post. Proceed to the next post repeating the previous method of driving a post.